Conditional Execution
You may want to execute a different actions based on certain conditions of the incoming message.
You can do this using If..Then.. Else.. End If blocks.
Simple If Blocks
In the above example, we check that the incoming 'To' address contains 'support' then if the Subject contains either 'urgent' or 'ticket', then if the hour of the message is > 8 and <18 we send a Teams message, otherwise we send the email on to a 'outofhours' address.
Calling Other Automations
In addition to executing actions inside If blocks, you can also use the Call action to conditionally call an entire Automation.
General Email
Email To Database
At its simplest, ThinkAutomation can be used to update a database from received emails. For this sample to work, create a table in your database called Emails, with the following columns:
| Column Name | Type |
|---|---|
| Id | varchar(250) |
| FromAddress | varchar(500) |
| ToAddress | varchar(500) |
| Subject | varchar(2000) |
| Date | date |
| Size | integer |
| AttachmentNames | varchar(1000) |
| BodyText | text |
| BodyHtml | text |
You create Extract Field actions to extract each field from the incoming message. On each Extracted Field click the Database Update tab and enter the Update Table Name to 'Emails'. When you assign a database table name to an extracted field, ThinkAutomation automatically creates the SQL commands to update that table.
Add an Update A Database action to update your database.
Save Attachments
This sample shows how to automatically save all attachments on incoming messages to a local folder structure. Attachments will be saved to subfolders based on the from address, year and month.
The AttachmentRoot variable is set to the local root folder where we want to save attachments.
The AttachmentFolderName variable is set to the full path. The File Operation create folder action creates the folder if it does not exist.
Save Attachments To A Database
Files and attachments can be saved to a SQL database by assigning a file path to a Blob column.
For this sample to work, create a table called Attachments, with the following columns:
| Column Name | Type |
|---|---|
| FileName | varchar(250) |
| FileData | blob or varbinary(max) |
| FileType | varchar(10) |
| FileSize | int |
| SenderEmail | varchar(250) |
We use a For..Each action to loop on Attachment. For each attachment the loop sets the FileName variable to the current attachment filename and the Location variable to the file path where ThinkAutomation saves the attachment during message processing.
The Extension variable is set to just the file extension using the Set action with the Extract File Extension operation. The Size variable is set to the file size using the File Operation action.
The Update A Database Using Custom SQL then inserts a record into the Attachments table.
The Update A Database action is shown below:
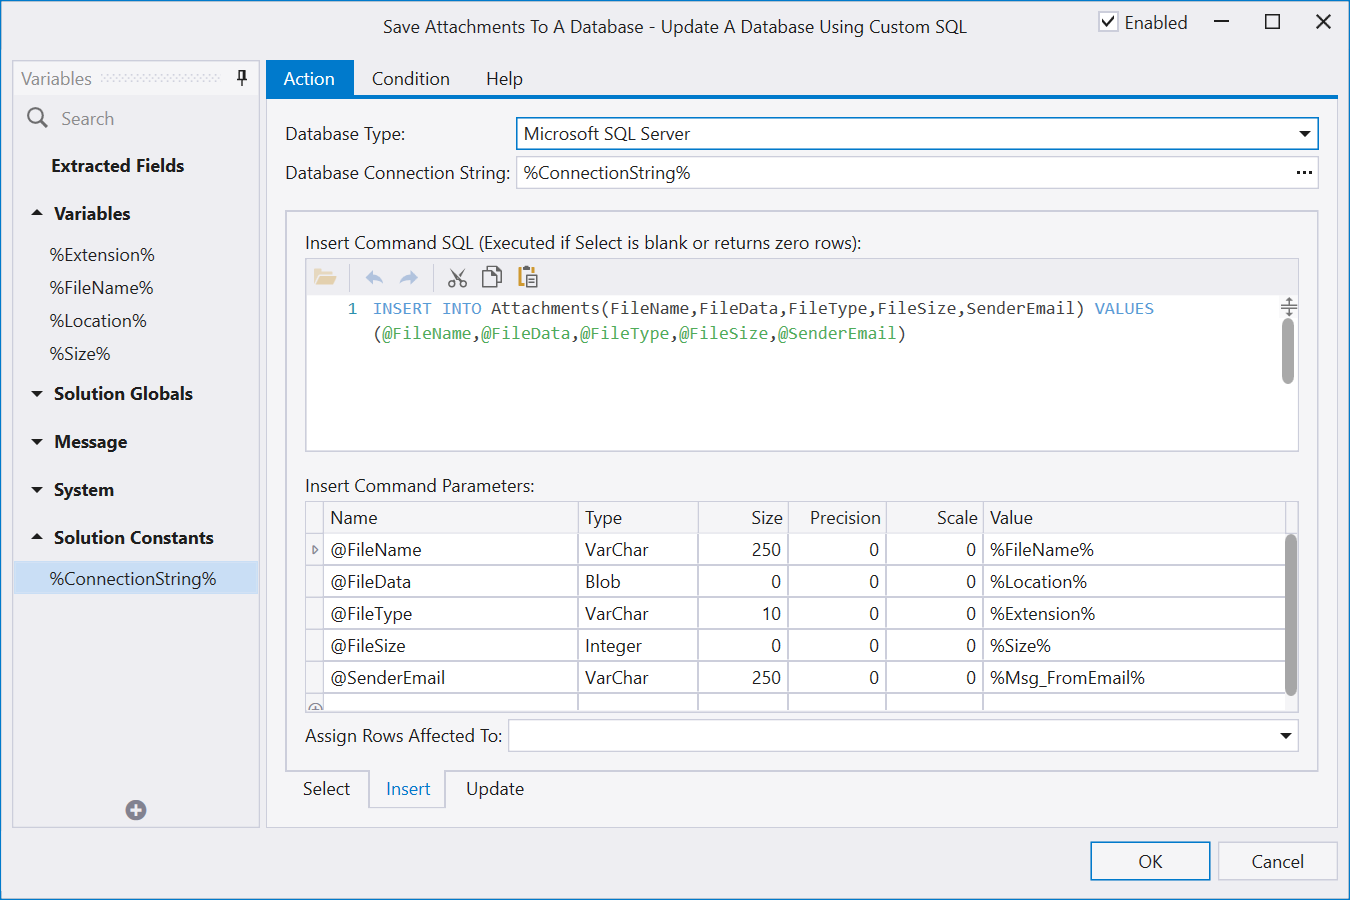
The @FileData parameter type is set to Blob and the Value set to the %Location% variable. If the parameter type is Blob and its value is set to a file path then the actual file contents are read and assigned.
Process Order
This sample shows how to process an order email. The incoming email body is in the following format:
We have received an order for your product "Widget".The credit card charge has been authorized.We sent out the license key of the program to the user:Order No. = 986Program = 123456Number of licenses = 1Ref.No. = 56789Reseller =Promotion =Net sales = USD 120.00Net Discount = USD 0.00collected VAT = USD 0.00Shipping = USD 0.00VAT on Shipping = USD 0.00Our service fee = USD -8.95VAT on service fee = USD 0.00Total = USD 111.05User data:Salutation =Title =Last Name = MillerFirst Name = DanCompany = Ace ClothingStreet = 24a Stanley StreetZIP = ST6 6BWCity = Stoke on TrentFullCity =Country = United KingdomState / Province = StaffordshirePhone = 01782 822577E-Mail = dan@mydomain.comVAT ID =Payment = Credit Card: VisaRegistration name = Dan MillerLanguage = English
Extract Field actions are created to extract each item that we need. A database table/column name is assigned to each field allowing for an automatic Update A Database action.
The GeoIP Lookup action is used to check that the country for the customers email address is the same as the country specified on the order.
The Create Document action is used to create a PDF receipt. The Send Email action is used to send an email back to the customer with the PDF receipt as an attachment.
The Execute A Database Command action is used to call a stored procedure to check if the customer is new. The IsNew variable is set to True if the customer is new and an email is sent to the sales team to indicate a new customer.
Finally, if the Phone field is not blank then the Normalize Phone Number action is used to correctly format the phone number based on the customer's country. The Twilio Send SMS Message action is used to send an SMS message to the customer.
Creating An Email Archive Search System
You can use ThinkAutomation to create a centralized email archive and search solution. A web form can be used for the search - with the results shown in a grid. Multiple email accounts can be combined into a single search view.
First, create a new Solution.
Set the Keep Message For (Days) entry on the solution properties to a high value (so that ThinkAutomation does not automatically remove old messages).
On the Solution Properties, select the Keywords tab and enable the Extract And Save Unique Keywords For Messages Added In This Solution option. ThinkAutomation will then extract all unique words from the body text for all incoming messages. These will be saved with each message in the Message Store database.
Creating Message Sources To Read Emails
Create a new Message Source to read emails from your email source (Office 365, Gmail, IMAP etc).
Create a new Automation for the new message source. The Automation itself does not need to perform any actions for the archive view.
Repeat the message source and automation for each of the email accounts you want to store and search against. Enable the Message Sources so that your emails will be read and saved to the ThinkAutomation Message Store.
Viewing The Archive
ThinkAutomation includes a built-in web-based Message Store viewer.
On the Solution Properties - select the Web Message Store Viewer tab.
Enable the Enable Web Based Message Store Viewer option.
Enable the Enable Access Via Public URL option if you want to allow access via Web API Gateway public URL. This will work from any location.
Enable the Require Login option if users must login with a valid ThinkAutomation Username/Password before viewing messages.
The Public URL box shows the URL for the public interface.
The Local URL box shows the local URL. This will work locally and on your local network (replace 'localhost' with the IP/DNS name of your ThinkAutomation server computer).
By default the web view will show a menu containing all Automations in the Solution. The user can select an Automation to view processed messages. If the Show Automations Menu option is disabled, then all messages for the solution will be shown.
Messages can be searched by entering any search text and clicking the search button. Enable the Show From And To Date Selectors if you want to include from/to dates on the search form.
Messages are shown in pages. The user can click the Previous and Next buttons to change pages. You can adjust the number of messages shown per page using the Messages Per Page entry.
When viewing messages - click the Envelope icon to view the full message detail.
The user can click the View link on each message to view the message detail.
Creating An AI Powered Chat Bot
AI Providers
Before using any of the AI features in ThinkAutomation, you first need to setup an AI Provider in the ThinkAutomation Server Settings - AI Providers section.
ThinkAutomation supports OpenAI ChatGPT, Azure OpenAI, xGrok, Claude, Perplexity or OptimaGPT (Parker Software's on-premises AI server). To create an OpenAI account, go to https://openai.com and click the Sign Up button to create an account. Then go to https://platform.openai.com/overview, click your account and then select View API Keys. Click the Create Secret Key button to create a new API key. Make a note of this key as it is only displayed once.
Multiple AI Providers can be setup, and you can have a different AI Provider that uses the same provider type, but using a different model.
OptimaGPT
OptimaGPT is Parker Software's on-premises or private-cloud hosted AI Server. OptimaGPT supports a variety of freely available public AI models. It enables you to use AI locally, without sending private or sensitive data to a 3rd party. This makes it ideal for organizations needing to avoid external data transfer due to privacy regulations. See: OptimaGPT for more information.
Using AI With A Local Knowledge Store
ThinkAutomation is an example of a Retrieval-Augmented Generation (RAG) server. It is able to call an AI along with additional context obtain from local resources.
You can use ThinkAutomation to create web chat forms. A web chat form is similar to the Web Form message source type, except that the users message and the automation response is shown in a conversation-style UI.
Your Automation will receive each chat message as a new incoming message. The return value from your Automation is then sent back to the chat form and displayed to the user.
In this example we will use the Ask AI automation action to send the user's incoming message to an AI and then send the AI response back to the user. Before that, we use the Ask AI action to search the Embedded Knowledge Store using the user's message as the search text so that we can give the AI some context based on the user's message. This will enable the AI to answer the question even though it has no training data.
You then need to create a Knowledge Store collection. A Knowledge Store collection is a database of articles relating to the knowledge that you want your chat bot to be able to answer questions on. You can create a Knowledge Store collection using the Embedded Knowledge Store Browser on the Studio File menu. Here you can import files & documents. You can also use a separate Automation to update your knowledge store using the Embedded Knowledge Store action. For example, you could have an Automation that takes incoming emails and updates the knowledge store - users can then simply send an email to a specific address when they want to add or update articles.
In ThinkAutomation, create a Message Source. Select Web Chat as the message source type and click Next.
Leave the Web Chat properties as they are for now (you can always tweak these later). Click Next and Next again to save the Message Source.
When you save a new Web Chat Message Source, ThinkAutomation will create a default Automation to receive the chat messages. The default Automation is shown below:
The Web Chat Message source receives user chat messages in the %Msg_Body% built-in variable. Any HTML characters will be decoded, so the first two Actions use the Set Variable action to HTML Entity Decode the %Msg_Body% and trim. The variable %ChatMessage% will then contain the incoming chat message.
The Web Chat form will automatically send the message [webchatstart] after the user has completed the Start Form form and is ready to chat. We check for this and send back a generic welcome message:
Welcome %Msg_FromName%! I can answer questions about {knowledge store name}.
You can change this - or set it to blank to not to show a welcome message.
We then add some default context to the conversation. This gives the AI some general information about us and tells the AI how to behave. The default will be set to:
You are a very enthusiastic representative working at {your company name}.Given the provided sections from our {knowledge store name} documentation,answer the user's question using only that information,outputted in markdown format.
You can change this if required.
The following action adds more context to the conversation. This time we search the Knowledge Store for the top 5 most relevant articles relating to the %ChatMessage% - IE: The last message received from the chat form.
Note: You could also add context from a database or any other source. For example, you could do a database lookup of recent orders for a customer based on their email address, and add these as context allowing the user to ask questions about recent orders.
After adding context we then call the AI itself with the user's question. The prompt is formatted as follows:
Question: """%ChatMessage%"""Answer:
This format is not strictly required. You could just send %ChatMessage% - however clearly separating the question tells the AI that it needs to provide an answer.
We then return the response from the AI. This response will be shown in the web chat form. The user can then send another message and the process repeats. Each time further context is added. The old context remains until it reaches the AI token limit. When the token limit is reached ThinkAutomation automatically removes the oldest context. When ThinkAutomation adds context to the conversation - it only adds items that do not already exist in the conversation, so its safe to re-add context that may already be there.
Any changes you make to your Knowledge Store will take effect immediately - so as you add more articles the accuracy of the AI responses will improve.
All of the AI and context actions require a Conversation Id. This is simply some text that uniquely identifies the current web chat user. By default the Web Chat form asks for the users Name and Email Address when the chat starts. These will be set to the incoming message From address. This means you can use the built-in message variables %Msg_FromName% or %Msg_FromEmail% as the conversation id. You can also use the built-in variable %Msg_ConversationId% which is a hash of the from/to email addresses and subject. All incoming messages and responses from the same conversation id will be grouped as a 'conversation' - even over multiple automation executions. If you do not ask for a name or email at the start of the chat you could use %Msg_FromIP% - which is the built-in variable containing the web chat user's IP Address.
Each incoming chat message causes your Automation to execute. So each chat message & Automation return value is stored in your Message Store database, just like regular messages.
To test your bot, right-click the Message Source and select Open Public Web Form or Open Local Web Form.
Creating An AI Powered Email Responder
You can use the same process to create an AI powered email responder. You could create a first-line support email address that responds using the same Knowledge Store as the chat form.
The incoming message doesn't have to be a Web Chat form. It could be email, SMS, Teams etc - in fact any of the ThinkAutomation Message Source types.
Create an Email Message Source in ThinkAutomation - that reads the mailbox you want to use for your email 'bot'. The Automation that executes for new email messages will be similar to the Web Chat Automation, with some minor differences.
First - we cant use the %Msg_Body% built-in variable as the prompt text. The reason is that if a user replies to a bot email, then the new incoming email will contain the whole thread. We cant send the whole thread to the AI each time - since the knowledge base search wont be as targeted and the text may go above the token limit. The conversation context will already have any previous email related context anyway.
Instead we can use the %Msg_LastReplyBody% built-in variable. This field is automatically set to the email body WITHOUT all previous quoted replies.
The other main difference is the default context. This needs to be something like:
Your name is '{botname}' and you are a very enthusiastic representativeworking at {your company name} answering emails about {knowledge store name}.Given the provided sections from the knowledge base, answer the questionusing only that information, outputted in markdown format.If an answer cannot be found in the information provided, respond with'I cannot help with that' only. Do not try and answer the question if theinformation is not provided.Add a friendly greeting and sign off message to your response.Your email address is '{bot email}'.My email address is %Msg_FromEmail%
We tell the AI that it is answering emails - and we tell it to add a friendly greeting and sign off message. We also tell it what its name is.
Responses will then be more like:
Hi {Name},{response}Best regards{bot name}
Alternatively you could use the same default context as with Web Chat forms and add the greeting and sign off/footer in the Send Email Action.
After receiving the response from the AI you would then send an email back to the sender, with the message body set to the AI response.
Creating An AI Powered Chat Bot That Can Answer Questions About Local Documents
Suppose you have a local folder(s) on your file system that contain company documents. These may be in PDF, Word, Text or other formats. We can use ThinkAutomation to create an AI powered bot that can answer questions about the content of these documents. If documents are updated or more documents are added to the folder, ThinkAutomation will automatically make the changes available to the AI.
ThinkAutomation includes a 'Vector Database' action. A vector database is a type of database designed to store, index, and search data represented as vectors, typically high-dimensional numerical arrays. When searching, instead of exact matches (like in traditional databases), vector databases find similar items using approximate nearest neighbor (ANN) algorithms.
In this example, we have a folder containing incoming resume's. We want to create a chat bot that can answer questions about job candidates.
In ThinkAutomation, create a Message Source. For the Name enter a name that represents the subject matter (eg: 'Job Applicants'). Select File Pickup as the message source type and click Next. Select the folder containing your documents, and enable the Include Sub-Folders option if the folder contains sub-folders.

Click Next:

Enable the Index Document Contents To Use With AI option and the Also Create Chat Message Source And Automation. The Vector Database Collection will be set to the Message Source name - but can be changed, or you can select an existing one (if you are using multiple message sources to update the same Vector Database).
Click Next.
ThinkAutomation will then automatically create an Automation to read the folder contents and add the document text to the Vector Database:

The File Pickup Message Source scans the selected folder. The Automation for that message source converts supported document types to plain text using the Convert Document To Text action, and then adds the text to the Vector Database using the Embedded Vector Database automation action.
The Message Source will be disabled when it's first created. Right-click it and select Enable to start the process of indexing your documents. This may take several minutes on the first scan if your folder contains many documents.
An additional Web Chat Message Source and Automation will also be created. The Web Chat Automation will receive each chat message as a new incoming message. The return value from your Automation is then sent back to the chat form and displayed to the user.
This Automation is similar to the Chat Bot created earlier, except we are searching for context from the Vector Database instead of the Knowledge Store. The Vector Database is more suitable for large volumes of data.
To test your bot, right-click the AI Chat Message Source and select Open Public Web Form or Open Local Web Form:
You can now ask questions relating to the documents. Any new or updated documents will be automatically added to the Vector Database - and be available for answers.
The benefit of this approach is that you do not need to upload documents to a 3rd party AI provider. This saves time, reduces costs and helps with privacy/regulatory concerns. You could also update the same Vector Database from other sources (email, CRM data etc.).
As with the Creating An AI Powered Email Responder sample, you could setup your Automation to return the response via email, instead of a chat form. Then user's can email their questions to the bot.
Using AI To Chat With Local Databases
You can also use ThinkAutomation and AI to chat with your own local databases. You can quickly create a bot that allows you to asks questions about the data using natural language.
In ThinkAutomation, create a Message Source. Give it a name (such as 'Customers Bot'). Select Web Chat as the message source type and click Next.
Leave the Web Chat properties as they are for now (you can always tweak these later). Click Next. Unselect the Use AI To Respond To Incoming Chat Messages and Use A Knowledge Store To Provide AI Context options - since we will be creating the Automation manually. Click Next to save.
Edit the default Automation and change it to:
The Web Chat Message source receives user chat messages in the %Msg_Body% built-in variable. Any HTML characters will be decoded, so the first two Actions use the Set Variable action to HTML Entity Decode the %Msg_Body% and trim. The variable %ChatMessage% will then contain the incoming chat message.
The Web Chat form will automatically send the message [webchatstart] after the user has completed the Start Form form and is ready to chat. We check for this and send back a generic welcome message.
We then use the Lookup From A Database Using AI action to read data from our database using the %ChatMessage% variable for the query text. This action uses AI to convert the natural language question into a SQL SELECT statement. It does this by sending details of your database schema long with the question to the AI.
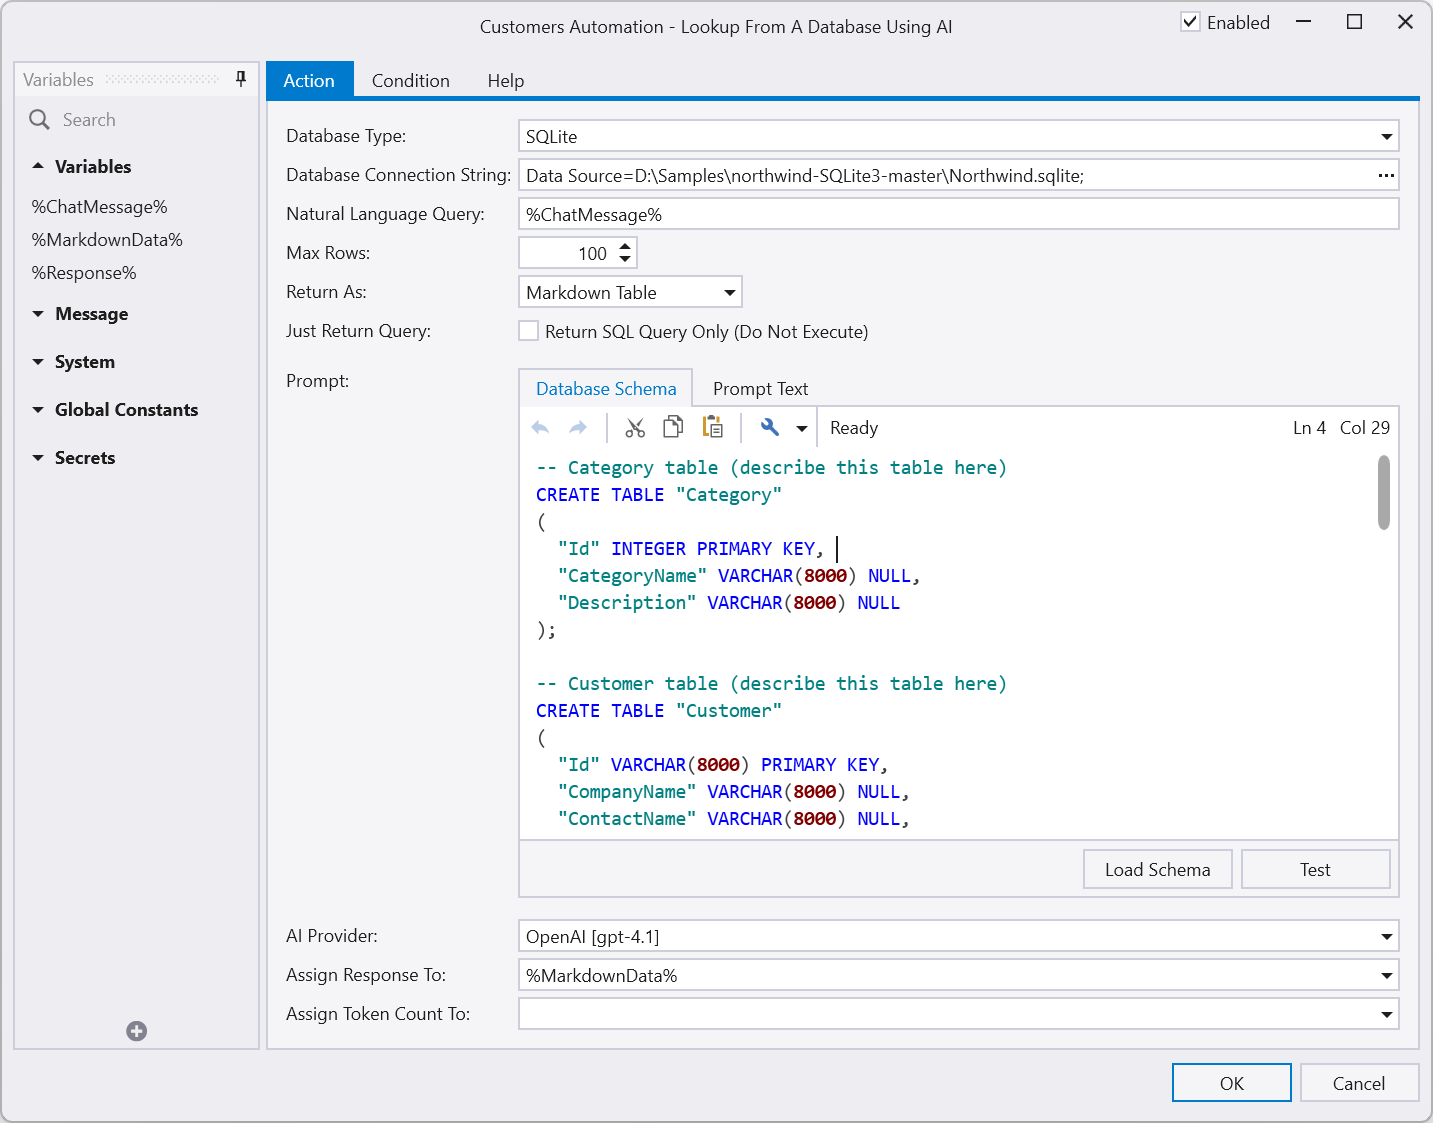
The database schema is generated automatically by clicking the Load Schema button. This is done once, when you create the action. You should include additional comments in the schema to describe the tables and any specific information about column data. This will help the AI in generating queries.
Most of the time the AI can figure out what a column is based on its name (IE: It will know that the 'CompanyName' column is used for the company name). However for vague column names or where the value represents a specific thing - you should add comments to the schema text. For example:
-- Movie Reviews table (a record for each movie review)-- The score column is between 1 and 100 - with 100 being the highest rated-- The orig_lang column is the language that the movie is in (eg: 'English')-- The country column is a 2 character ISO country code (in upper case)CREATE TABLE [Reviews] ( [names] TEXT, [date_x] DATETIME, [score] INT, [genre] TEXT, [overview] TEXT, [orig_lang] TEXT, [revenue] REAL, [country] TEXT );The generated SQL statement is then used to read the actual data from your database. The data is returned as text in a Markdown table format and assigned to the %MarkdownData% variable.
We could return the Markdown table directly to the chat. However we use the Ask AI action to add the data to the conversation as context using the Add Context To A Conversation operation.
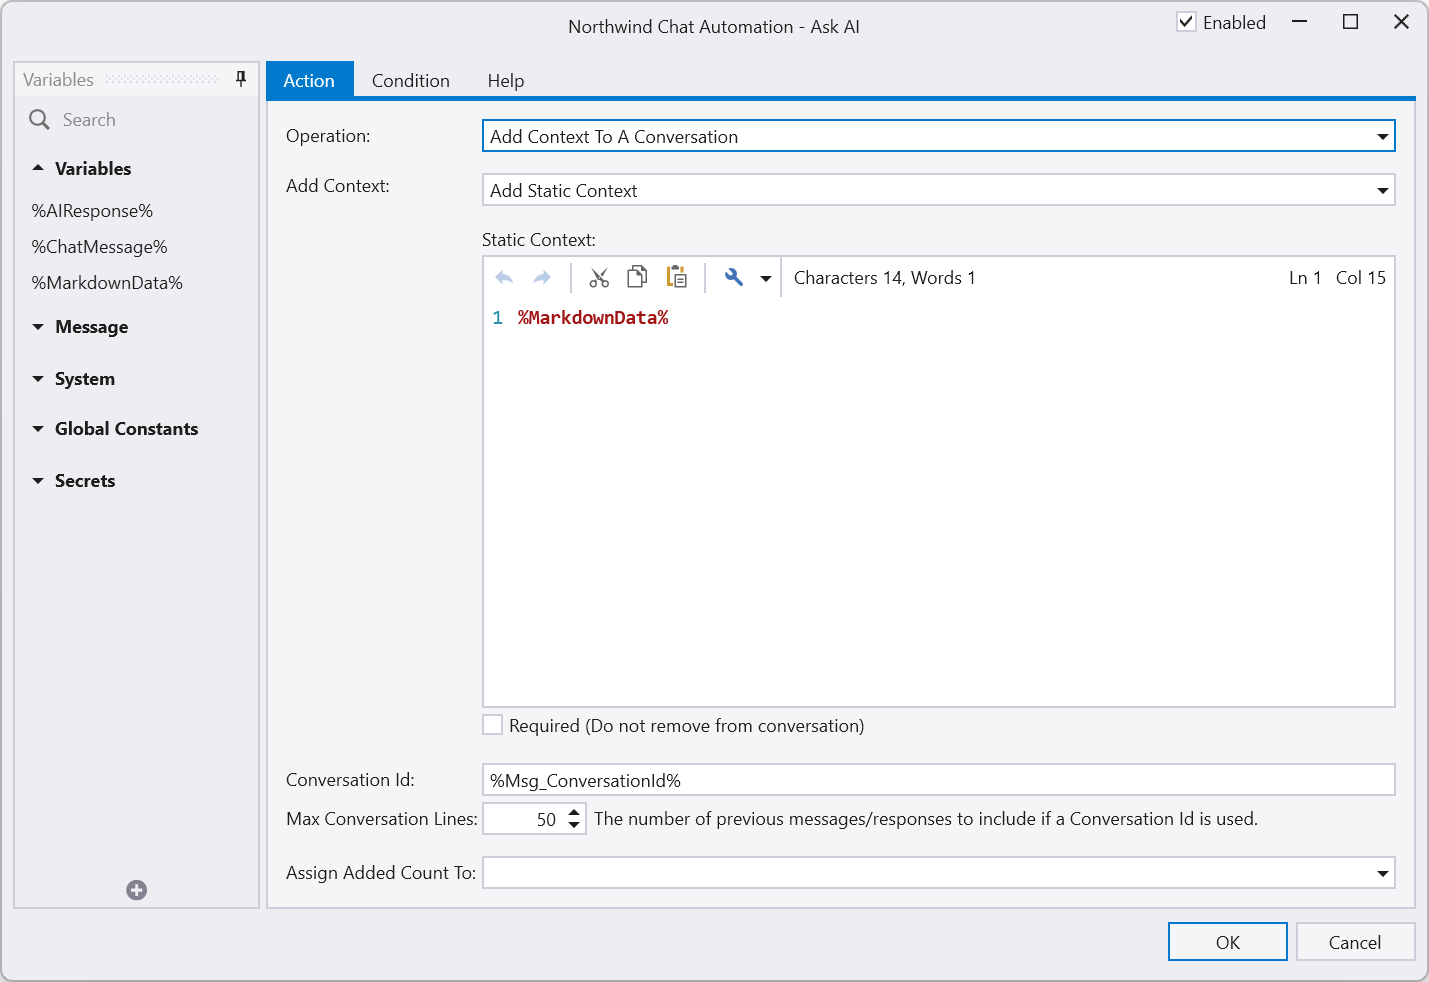
We then add an additional Ask AI action to ask the question again. This will return a human response rather than just a table of data.

The AI response is assigned to the %Response% variable, which we then return to the chat form.
You can expand on this by adding additional static context that describes the data and how it is used within your business. This will improve the AI response.
To test your bot, right-click the Message Source and select Open Public Web Form or Open Local Web Form.
As with the Creating An AI Powered Email Responder sample, you could setup your Automation to return the response via email, instead of a chat form. Then user's can email their questions to the bot.
Combining Local Documents And Database Lookups
You can combine document lookups - as shown in the Using AI To Chat Local Documents and database lookups as shown in the Using AI To Chat With Local Databases samples within a single Automation.
You could use the Lookup From A Database Using AI action to lookup data from a database, and then use the Ask AI action with the Add Static Context option to add any data returned to the conversation. This could be done prior to the Ask AI with the Add Context From A Vector Database search from the document store.
Context can be added by any means using the Ask AI - Add Static Context operation. The more context you provide the AI - the more data it has to work with when giving a response.
Adding An AI Connector Message Source
ThinkAutomation can act as an Model Context Protocol MCP server, exposing message sources as tools for external AI services. Each solution provides an endpoint that lets AI clients discover and call your automations to run actions and return dynamic context. Currently supports OpenAI provider only.
Adding one or more AI Connector message sources to your AI chat solution will automatically make these available to the AI during any Ask AI automation actions.
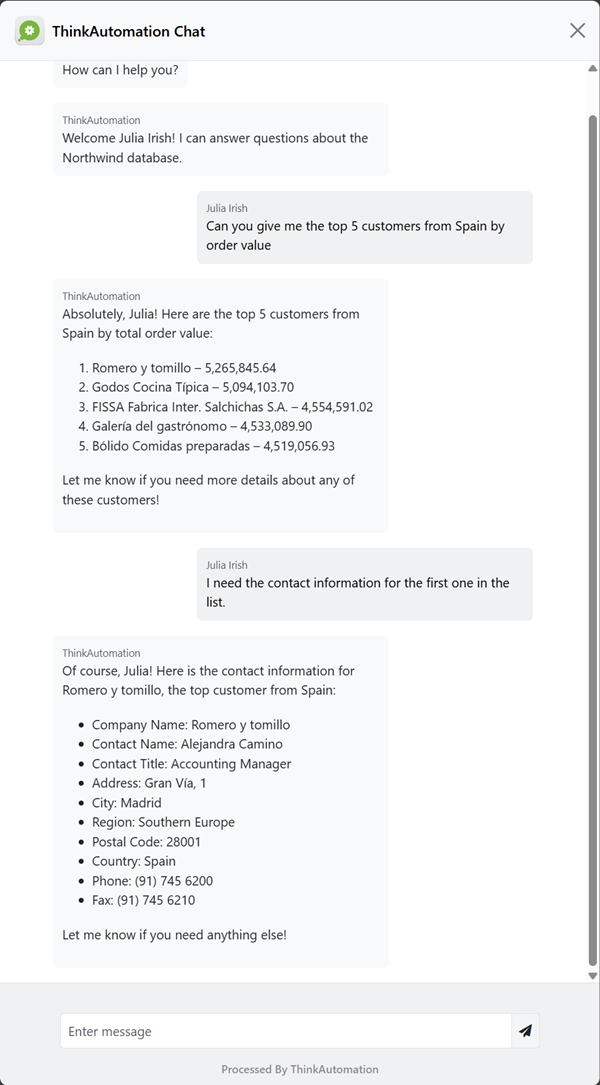
For example, suppose you want your chat bot to be able to provide information about specific customer invoices, so a user could ask questions such as 'What is the customer name for invoice 12345?'.
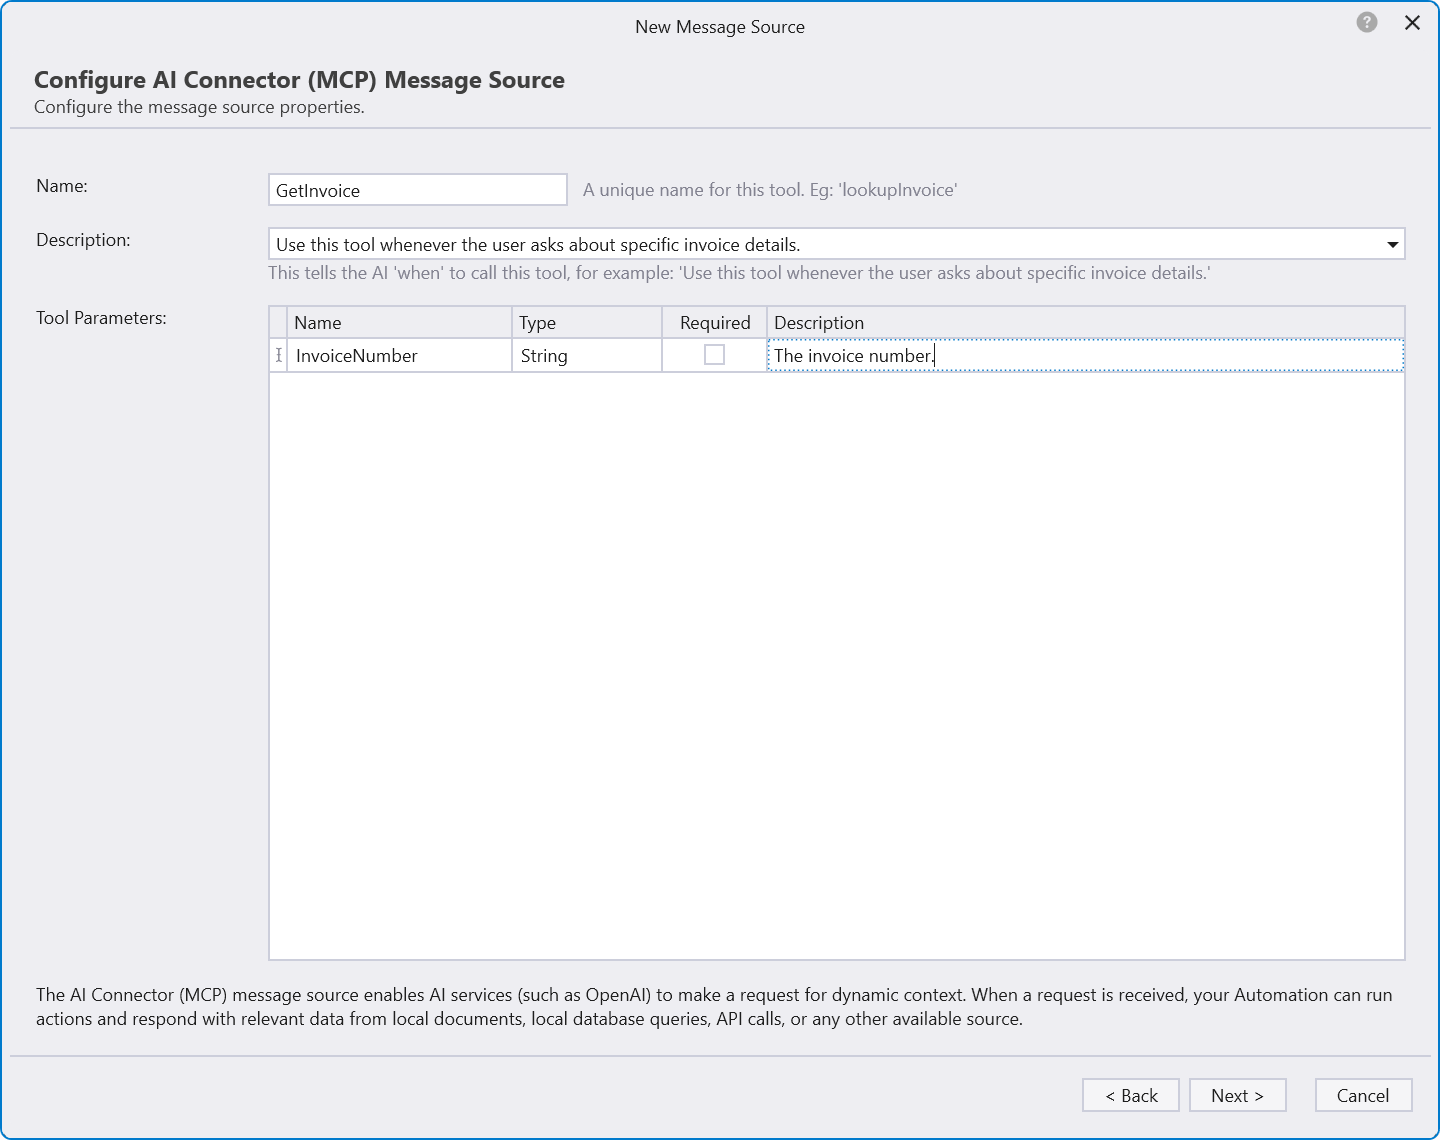
For this scenario we would create a new AI Connector (MCP) message source (this must be in the same Solution as your Web Chat message source). Click the New Message Source button and give it a name (for example: Get Invoice). Click Next >. Select AI Connector (MCP) for the message source type and click Next >.
The Name should be a short name (with no spaces or special characters) that describes the tool. For example: 'GetInvoice'.
The Description is used to tell the AI when it should call this tool. The AI itself decides if it needs to call this AI Connector when a user asks a question, so it needs to be descriptive. For example: 'Use this tool whenever the user asks about specific invoice details.'
The Parameters list is used to give details of specific values that the AI should extract or ask for. In this example, we have one parameter 'InvoiceNumber'. The description of the parameter needs to clearly identify what the parameter is (again, this is to help the AI).
Click Next > and Next > again to save.
An Automation will have been automatically created to extract the parameter values when the AI makes a request. You can edit this automation to perform any actions. The Return value of this automation will be returned to the AI to be used as context.
In this example, the Automation will execute whenever the AI is asked about a specific invoice. The automation checks a local folder for a PDF file using the InvoiceNumber. If it exists the file is returned, otherwise it returns a 'not found' message.
So, during a regular web chat, if the user asked 'What is the balance for invoice 12345?' - the AI would recognize that it needs to call this message source. The AI will extract the invoice number and pass this to ThinkAutomation. Your automation would execute and return a value. This value is then used by the AI to help it answer the question.
You can have any number of AI Connector message sources - each doing different things. Automations can be used to perform actions, not just return context. So you could have a 'SendEmail' AI Connector, with 'ToAddress', 'Subject' and 'Message' parameters. If the user asked 'Can I send an email' - the AI would ask for the 'to' address, subject and body and then make the call. Your automation could send the email and return a 'email sent' response.
Twilio SMS And Calls
Simple SMS Inbound
You first need to setup a Twilio account. Go to https://www.twilio.com and create an account. Go to your Twilio console - Phone Numbers - Buy a number. You can buy a local number for as little as $1 per month.
In ThinkAutomation, create a Message Source. Select Twilio as the message source type and click Next.
The webhook URL will be displayed. Click Copy to copy it to the clipboard.
Back in Twilio - select your phone number. In The Messaging section, select Webhook from the A Message Comes In selector and paste the URL shown in ThinkAutomation.
When you save the ThinkAutomation Message Source a new Automation will be created automatically. This Automation will contain Extract Field actions to extract data (from number, message text etc) from the incoming Twilio webhook.
You can then add additional functionality to your Automation.
In the example below, we connect to a local database and lookup from the Customers table using the senders phone number. If a customer does not exist we send back a message and end processing. Otherwise we send back a response based on the message text.
If you want to use the Twilio Send SMS Message action to send outgoing SMS messages you first need to enter your Twilio Account details in the ThinkAutomation Server Settings - Twilio Integration.
The From number for outgoing SMS messages must be one of your Twilio phone numbers. In the above example we created a Solution Constant called %MyNumber% containing our Twilio phone number.
Note: When sending SMS messages the 'To' phone number must always be the full international format (eg: +4477991234567). When you receive an SMS the senders phone number will already be in this format. You can use the Normalize Phone Number action to convert a local number to its international format if required.
SMS Inbound With Wait For Reply
This example expands on the previous. The customer sends 'Info' to our incoming Twilio number. The Lookup From A Database action is used to find the customer using their phone number. If the customer exists it sends back an SMS message asking which product they would like information about.
The Twilio Wait For SMS Reply action is then used to wait for a reply.
Based on the reply it sends an email to the customer with the information (the email address was found in the previous database lookup).
Call Me
This sample responds to an SMS with 'call' as the body. It asks the customer which department they need and then places a call with the required department. Once the department call is answered it connects the call to the customers phone. When the call is complete it sends an email to the customer with a recording of the call.
Run Different Automations Based On The SMS Received Message
When receiving incoming SMS messages you can either have different Twilio numbers and then separate ThinkAutomation Message Sources, or you can have a single Twilio Number with a single ThinkAutomation Message Source. The Automation that is called from this message source can then examine the SMS text and execute different blocks (based on the Select Case action) or call different Automations.
The example below uses the Call action to call different Automations based on the message text received.
Databases
Data Transformation
ThinkAutomation can be used to transfer data from one database to another - and to transform data during the transfer.
For example, we can create a ThinkAutomation Message Source to read data from a database. In this example we are reading from the AdventureWorks sample SQL Server database using the query:
SELECT * FROM Person.Person WHERE BusinessEntityID > @ID The parameter @ID is set to the built-in ThinkAutomation field %LastDatabaseId%. The %LastDatabaseId%value is set to a column value from the source query after each record - in this case BusinessEntityId. By doing this we improve performance - since each time ThinkAutomation reads records from the database it only has to read new records since the last query.
When you setup a Database Message Source the Test button allows you to preview the query results. It also can optionally create a new Automation with Extract Field actions automatically created for each column returned.
When the ThinkAutomation Message Source reads records from a database it creates as new message for each new row returned. The %Msg_Body% is set to Json. For example:
{ "BusinessEntityID": 1, "PersonType": "EM", "NameStyle": false, "Title": "", "FirstName": "Ken", "MiddleName": "J", "LastName": "Sánchez", "Suffix": "", "EmailPromotion": 0, "AdditionalContactInfo": "", "Demographics": "<IndividualSurvey xmlns=\"http://schemas.microsoft.com/sqlserver/2004/07/adventure-works/IndividualSurvey\"><TotalPurchaseYTD>0</TotalPurchaseYTD></IndividualSurvey>", "rowguid": "92c4279f-1207-48a3-8448-4636514eb7e2", "ModifiedDate": "2009-01-07"}If we used the Test button on the Message Source then the new Automation would default to:
Now we have extracted fields for each column.
If you wanted to simply insert/update this data into another database - you could add the database Table Name/Column Name to each extracted field (on the Database Update) tab. Then use the Update A Database action.
You could use the Update A Database Using Custom SQL action to perform a custom select > insert/update - and add additional data or modify values (using the Set action).
The Automation will then execute whenever new rows are returned from the Message Source query.
Transfer On-Premise Data To MongoDB or Azure Cosmos Cloud Database
When using the Database Message Source type, the %Msg_Body% is set to Json representing the row data. This makes it simple to then store this data in a document DB - such as MongoDB or Azure Cosmos.
If you wanted to change the Json - you can use the Create Json action to create custom Json text and assign fields or variables to each Json path.
JSON
Parsing Json Array
This example shows how to extract and parse a Json array.
Suppose we have the following Json:
{ "Actors": [ { "name": "Tom Cruise", "age": 56, "Born At": "Syracuse, NY", "Birthdate": "July 3, 1962", "photo": "https://jsonformatter.org/img/tom-cruise.jpg" }, { "name": "Robert Downey Jr.", "age": 53, "Born At": "New York City, NY", "Birthdate": "April 4, 1965", "photo": "https://jsonformatter.org/img/Robert-Downey-Jr.jpg" } ]}.. and we want to extract each Name & Age.
The Extract Field action is used to extract a specific Json Path. If the selected path is an array we can choose to return all items in the array to a comma separated value (CSV):
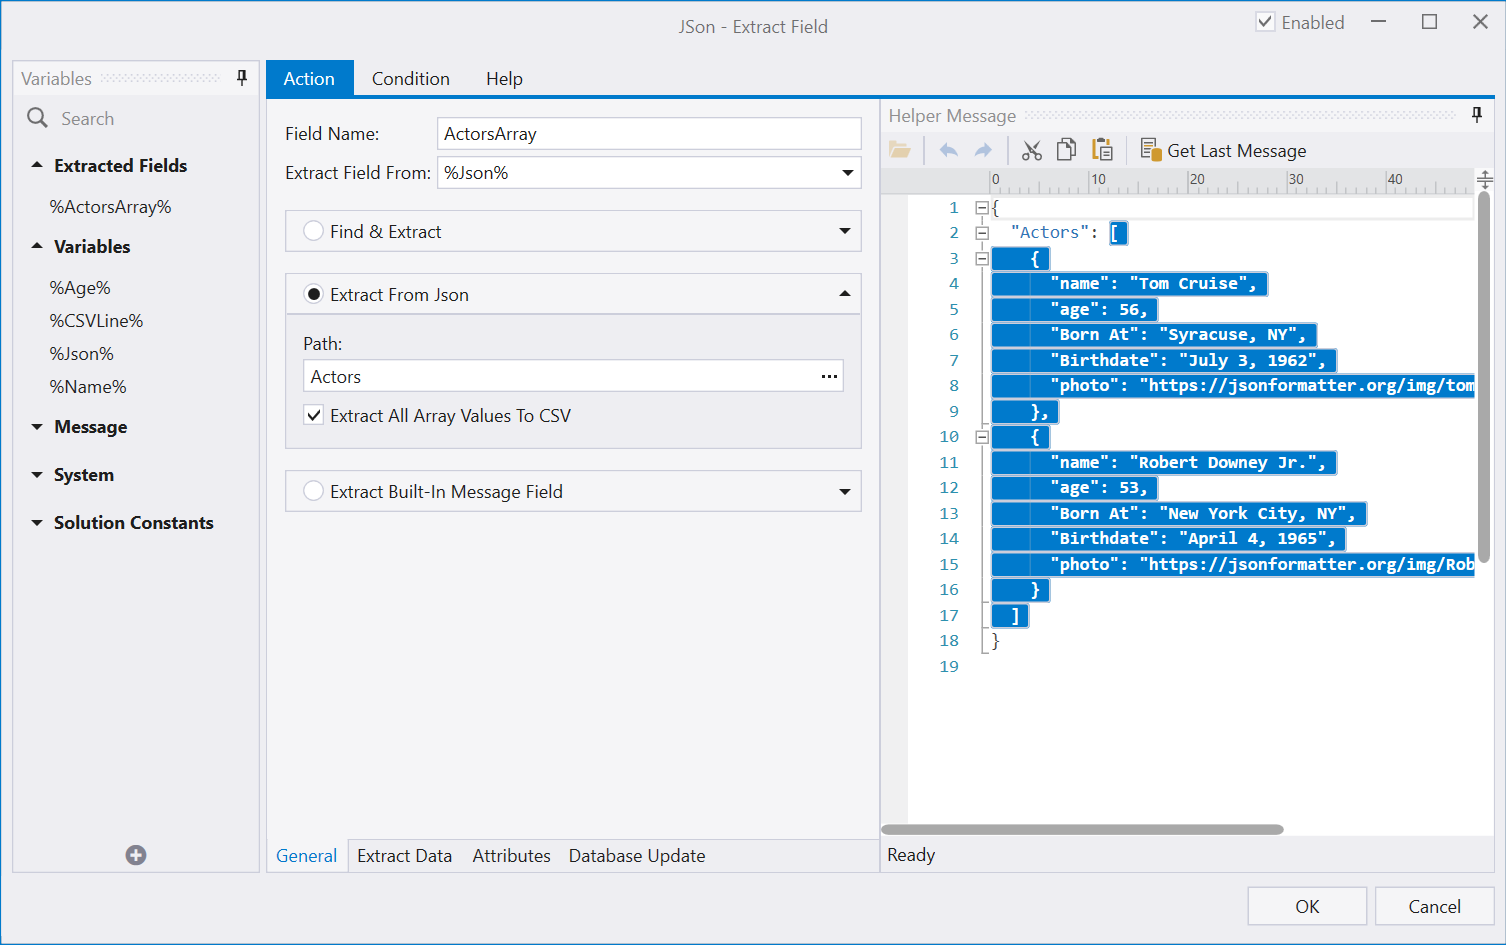
When extracted the ActorsArray field will contain:
Tom Cruise,56,"Syracuse, NY","July 3, 1962",https://jsonformatter.org/img/tom-cruise.jpgRobert Downey Jr.,53,"New York City, NY","April 4, 1965",https://jsonformatter.org/img/Robert-Downey-Jr.jpg
We then use the For..Each action to loop over each line in the returned CSV. Each line is assigned to the %CSVLine% variable.
Inside the loop the Parse CSV Line action is then used to get values from column 1 (and assign to the %Name% variable) and column 2 (and assign to the %Age% variable.)
CRM
Query CRM
This example shows how to read CRM Contacts and send an email to each record returned.
First we use the Query CRM Entities action to to read the Email, FirstName & LastName columns from the Salesforce CRM Contact table. The results are returned as CSV text to the CSV variable (there is also the option of returning as Json or Markdown).
We then use the For..Each action to loop on each Line in the CSV variable.
Inside the loop we use the Parse CSV Line action to get the Email, FirstName & LastName values and assign them to variables.
We can then use the Send Email action to send an email.
Add Attachments To A Salesforce Contact
In this example we want to check each incoming email. If a contact record exists in Salesforce with the from address of the incoming email we want to add any PDF attachments to the Salesforce contact record.
First we use the Get CRM Entity action to lookup a contact from Salesforce where the Email field is equal to %Msg_FromEmail%. If a contact is found the %ContactID% variable will be assigned the Salesforce contact id.
If a contact is found (the %ContactID% variable is not blank), we start an If block.
Each attachment must be assigned an OwnerId, this is the id of the user that is adding the attachment. We need to use the Get CRM Entity action to lookup the user record to get the user Id.
Note: You could save the user id as a Solution Constant to save having to look it up each time.
We then use the For..Each action to loop on each attachment. And then the Update CRM Entity action to add a record to the Attachments table. The Body field of the Salesforce table is a binary type. For binary types, if the assigned value is a path the actual file contents will be read and assigned.
Using The Embedded Document Database
The Embedded Document Database provides an easy to use way to store and retrieve data without having to configure or use an external database.
Store Incoming Email Addresses
This example shows how to store and retrieve data using the Embedded Document DB. Suppose we want to maintain a database of incoming email addresses along with a count of how many emails have been received for each address.
We will use a database name 'EmailSenders' with a collection name 'Incoming'. The database & collection will be automatically created when the first record is added.
Each document in the collection will be simple Json:
{ "Name": "Andrew Bentley", "Email": "andrew@ctestcompany.co.uk", "LastDate": "2021-09-22T12:14:23Z", "LastSubject": "Top 10 new vehicle leasing offers", "ReceivedCount": 1}We first use the Embedded Data Store action to lookup an existing document using a SQL SELECT statement:
SELECT _id, ReceivedCount FROM Incoming WHERE Email = @EmailThe @Email parameter value is set to the built-in field %Msg_FromEmail%.
This will return a Json document:
{ "_id": "614b124213d7e51e08910fd5", "ReceivedCount": 1}... if a document is found, or blank otherwise.
The results are returned to the %ExistingJson% variable.
If the %ExistingJson% variable is not blank (IE: A document was returned). Then we use the Extract Field action to extract the _id and ReceivedCount fields. We then use the Set action to Increment the %ExistingCount% variable.
We then use the Embedded Data Store action to update the existing document, using a SQL UPDATE statement:
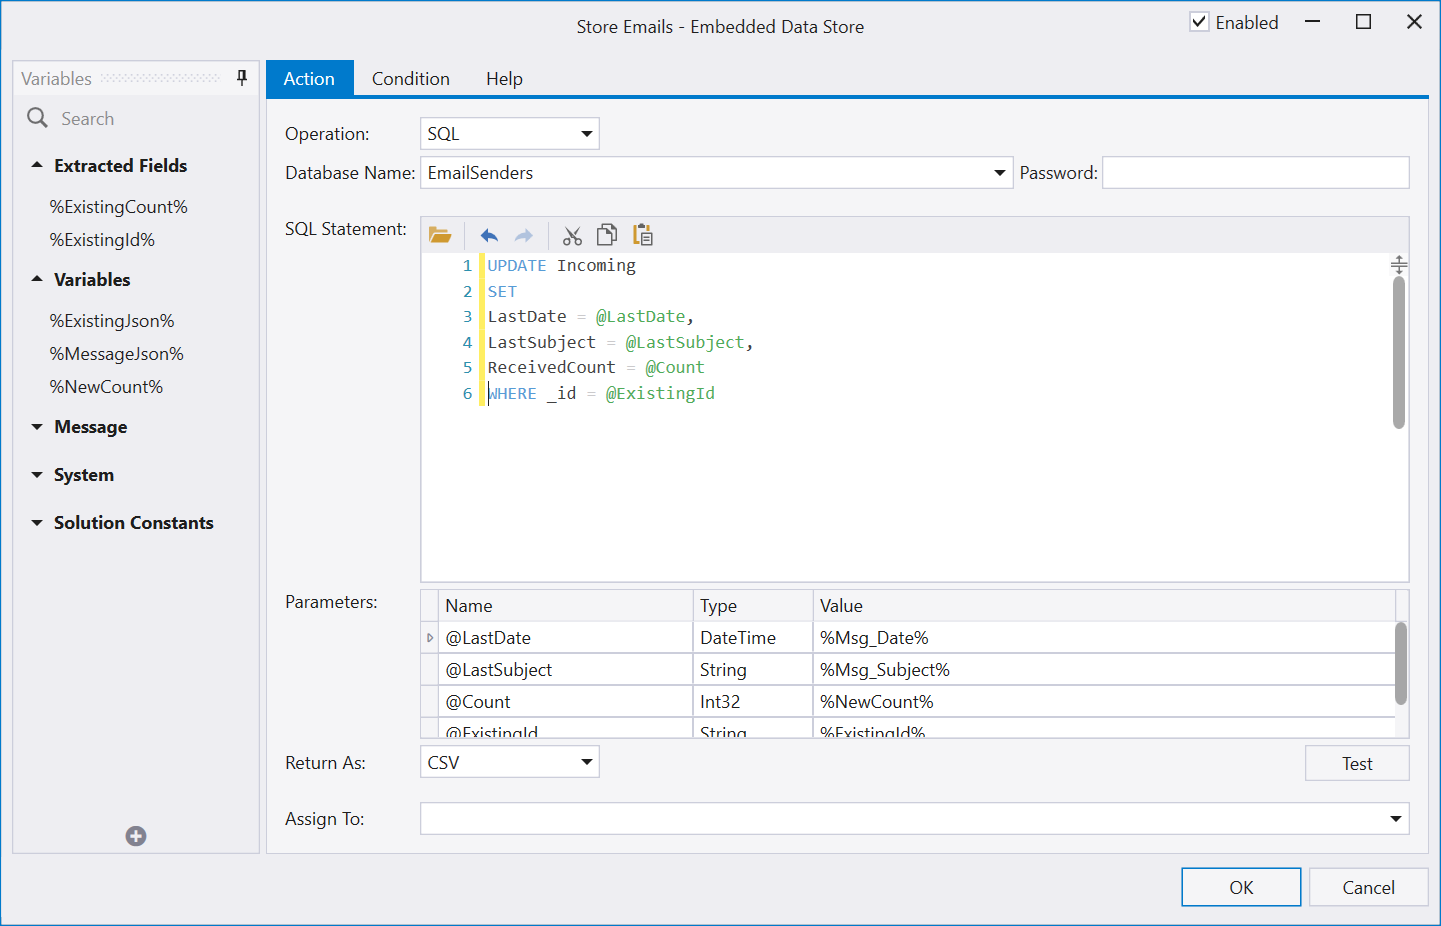
If a document was not returned from the first lookup we insert a new one.
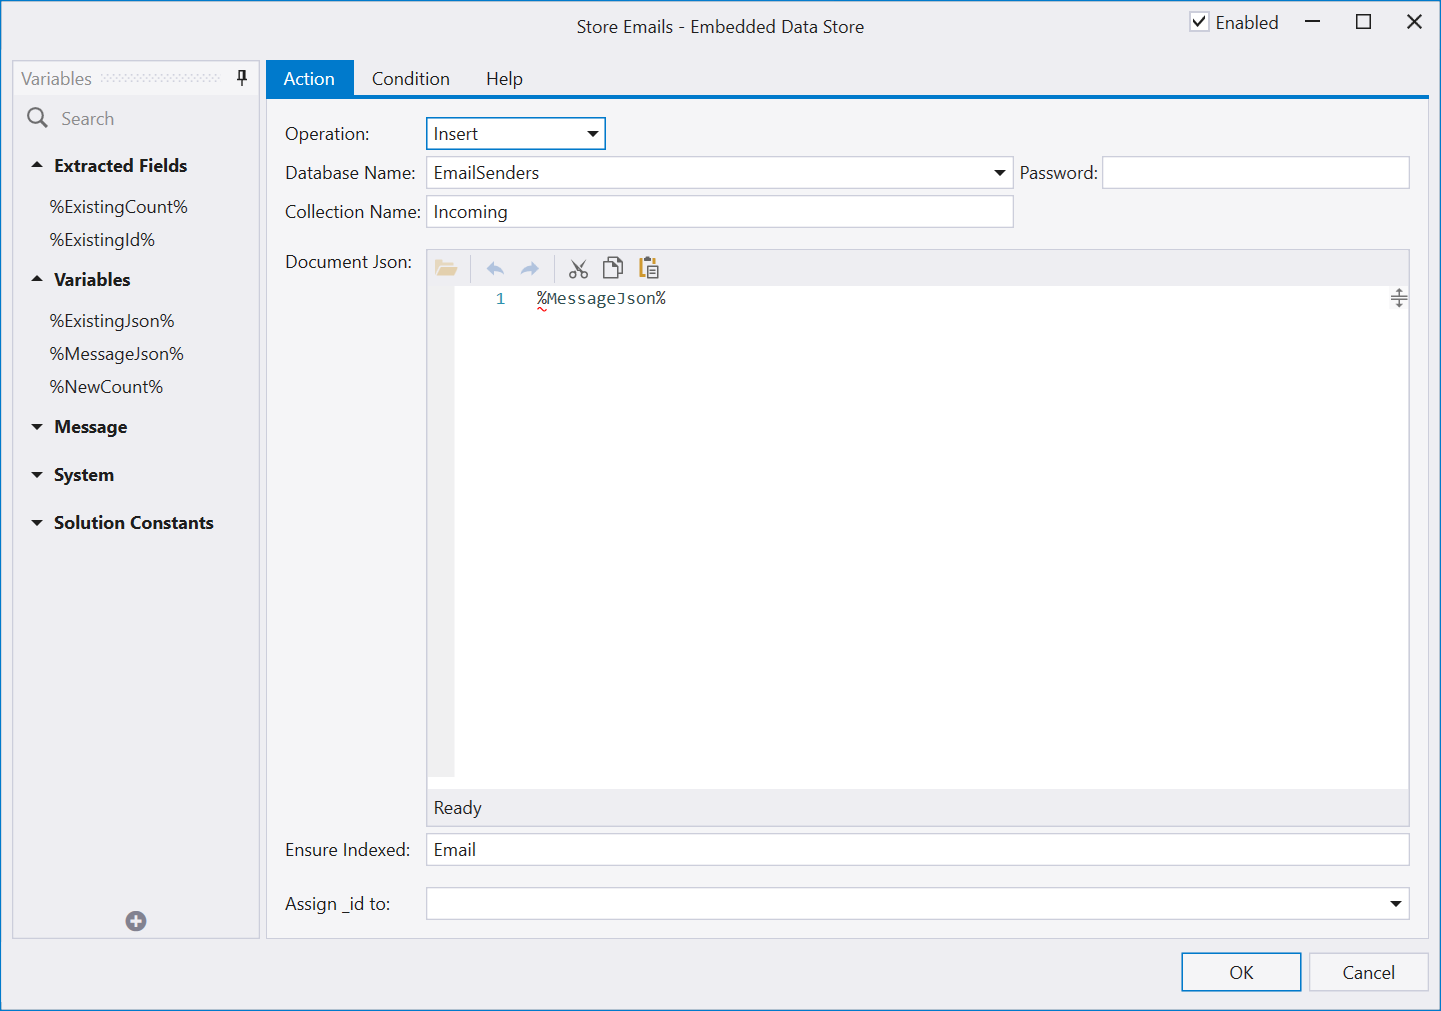
We use the Create Json action to create our Json:

and then the Embedded Data Store action to insert it:
This Automation could be called from an email source (Office 365, Gmail etc). When each new email arrives the EmailSenders database will be updated.
After processing some messages the EmailSenders 'Incoming' collection will contain a document for each unique incoming address along with a count of emails received and the last subject & date.
This database could be queried on any other Automations. For example: to get a list of the top 10 email senders you would use:
SELECT Email FROM Incoming ORDER BY ReceivedCount DESC LIMIT 10This can be returned as a Json array or as CSV.